After an unwanted hiatus, work has resumed on the 8-Bit development front. I've spent a great deal of time with my various systems and I've come to focus on two primary workstations.
I have yet to deeply explore the Z180 systems, and mostly use them for retro gaming, but I've been diving deep into the Z80 SCC ecosystem and I have some insights and builds to share.
First let's look at the systems. They represent the spectrum of RC2014 compatibility from the original 40-pin standard running simple monitors or CP/M 2.2 to the latest designs offering RomWBW and supporting hardware using RCBus-80 pin standard.
As we've seen I also maintain some Z50Bus systems, but these are not relevant to today's discussion.
The Workstations
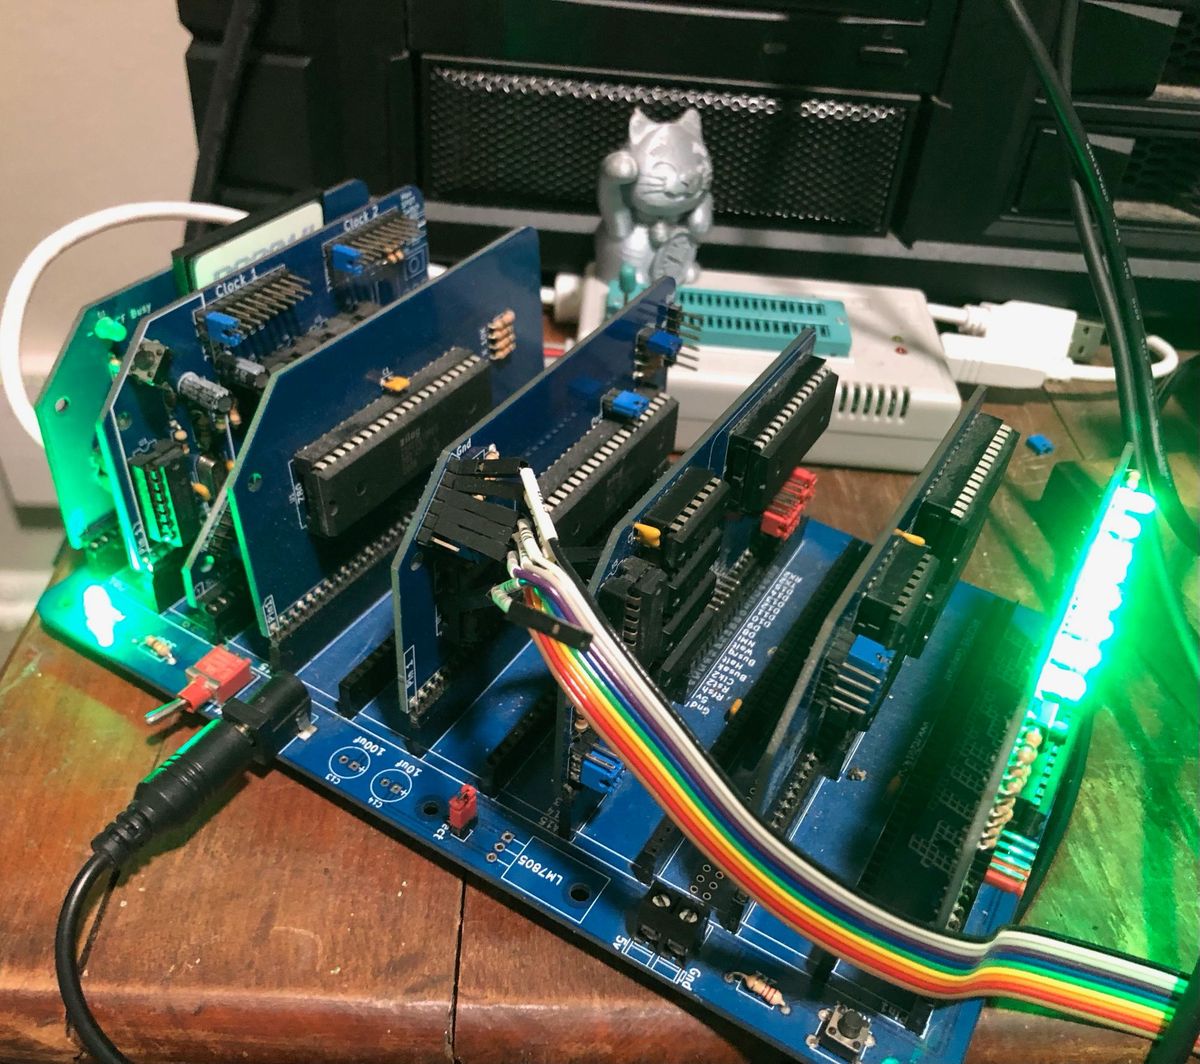
SC720 SBC:
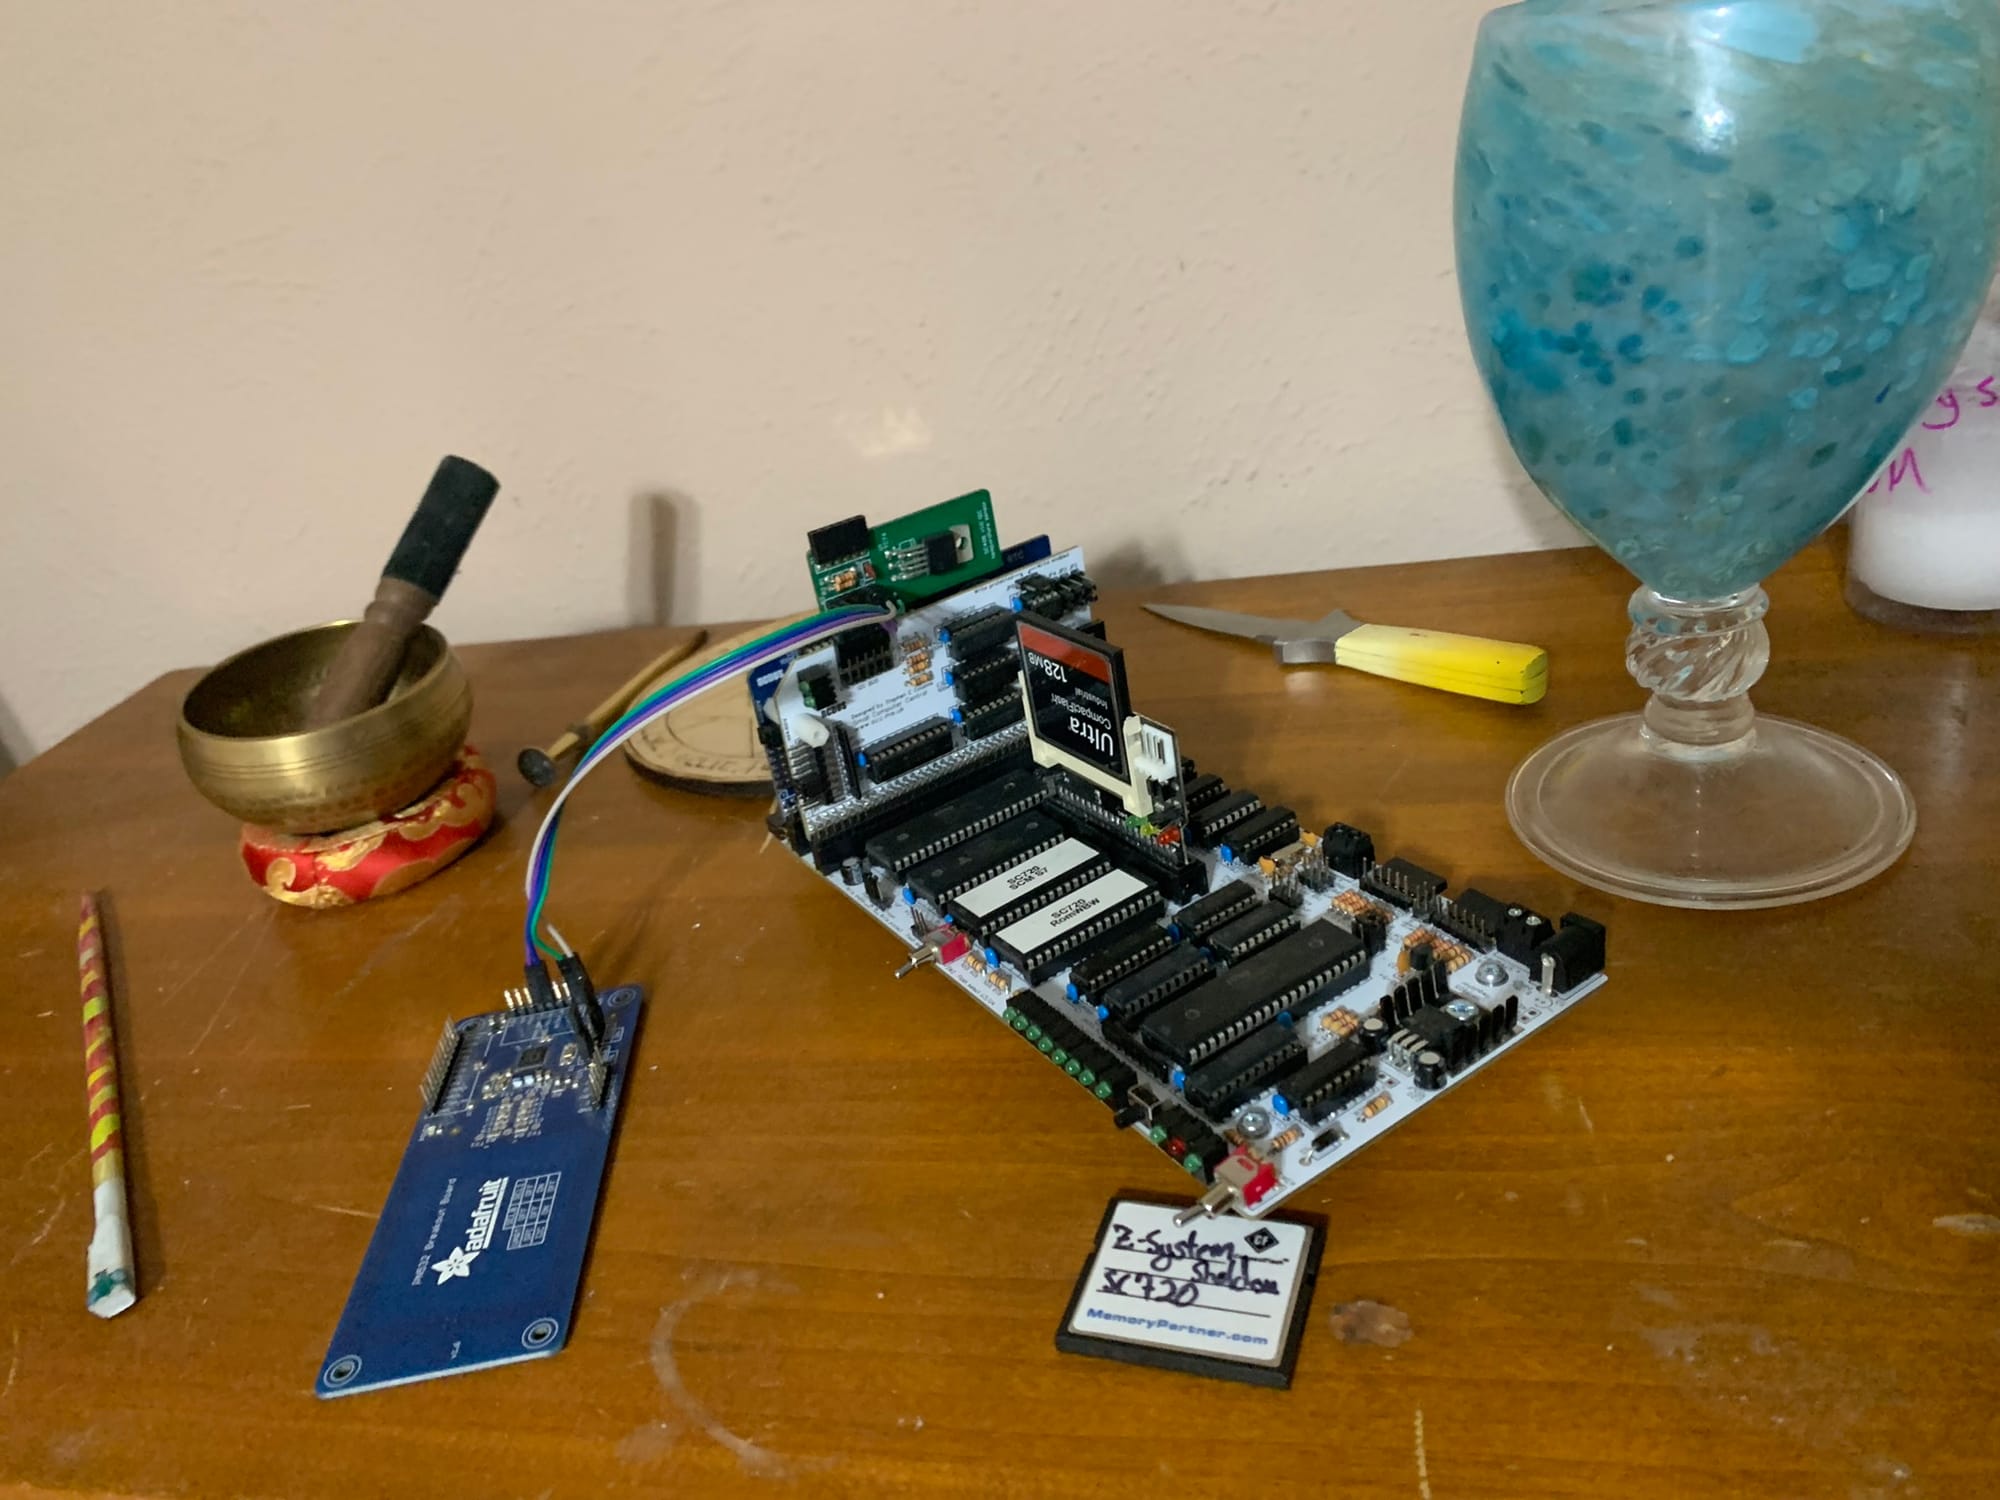
The SC720 is probably the single most capable board in the SCC lineup, at least in the Z80 range, and the more I learn with it the more I'm blown away by it. This base SC720 is extended semi-permanently with a Real-Time Clock module (SC727) and an i2c Bus Master module (SC704). It can also be connected to external backplanes to expand even further, though it begins to take up a good deal of space when doing so.
For both of the workstations we're looking at today, it's important to take a look at their memory modules and understand how they work. The memory module on the SC720 is built into the main board, and it provides the ability to switch between one of two separate ROM chips. Additionally, regardless of which chip is selected, the robust paging of the SC714 Memory Module is available.
We'll take a closer look at the SC714's paging model and how to utilize it for the SC720 further on.
SC100 Series:
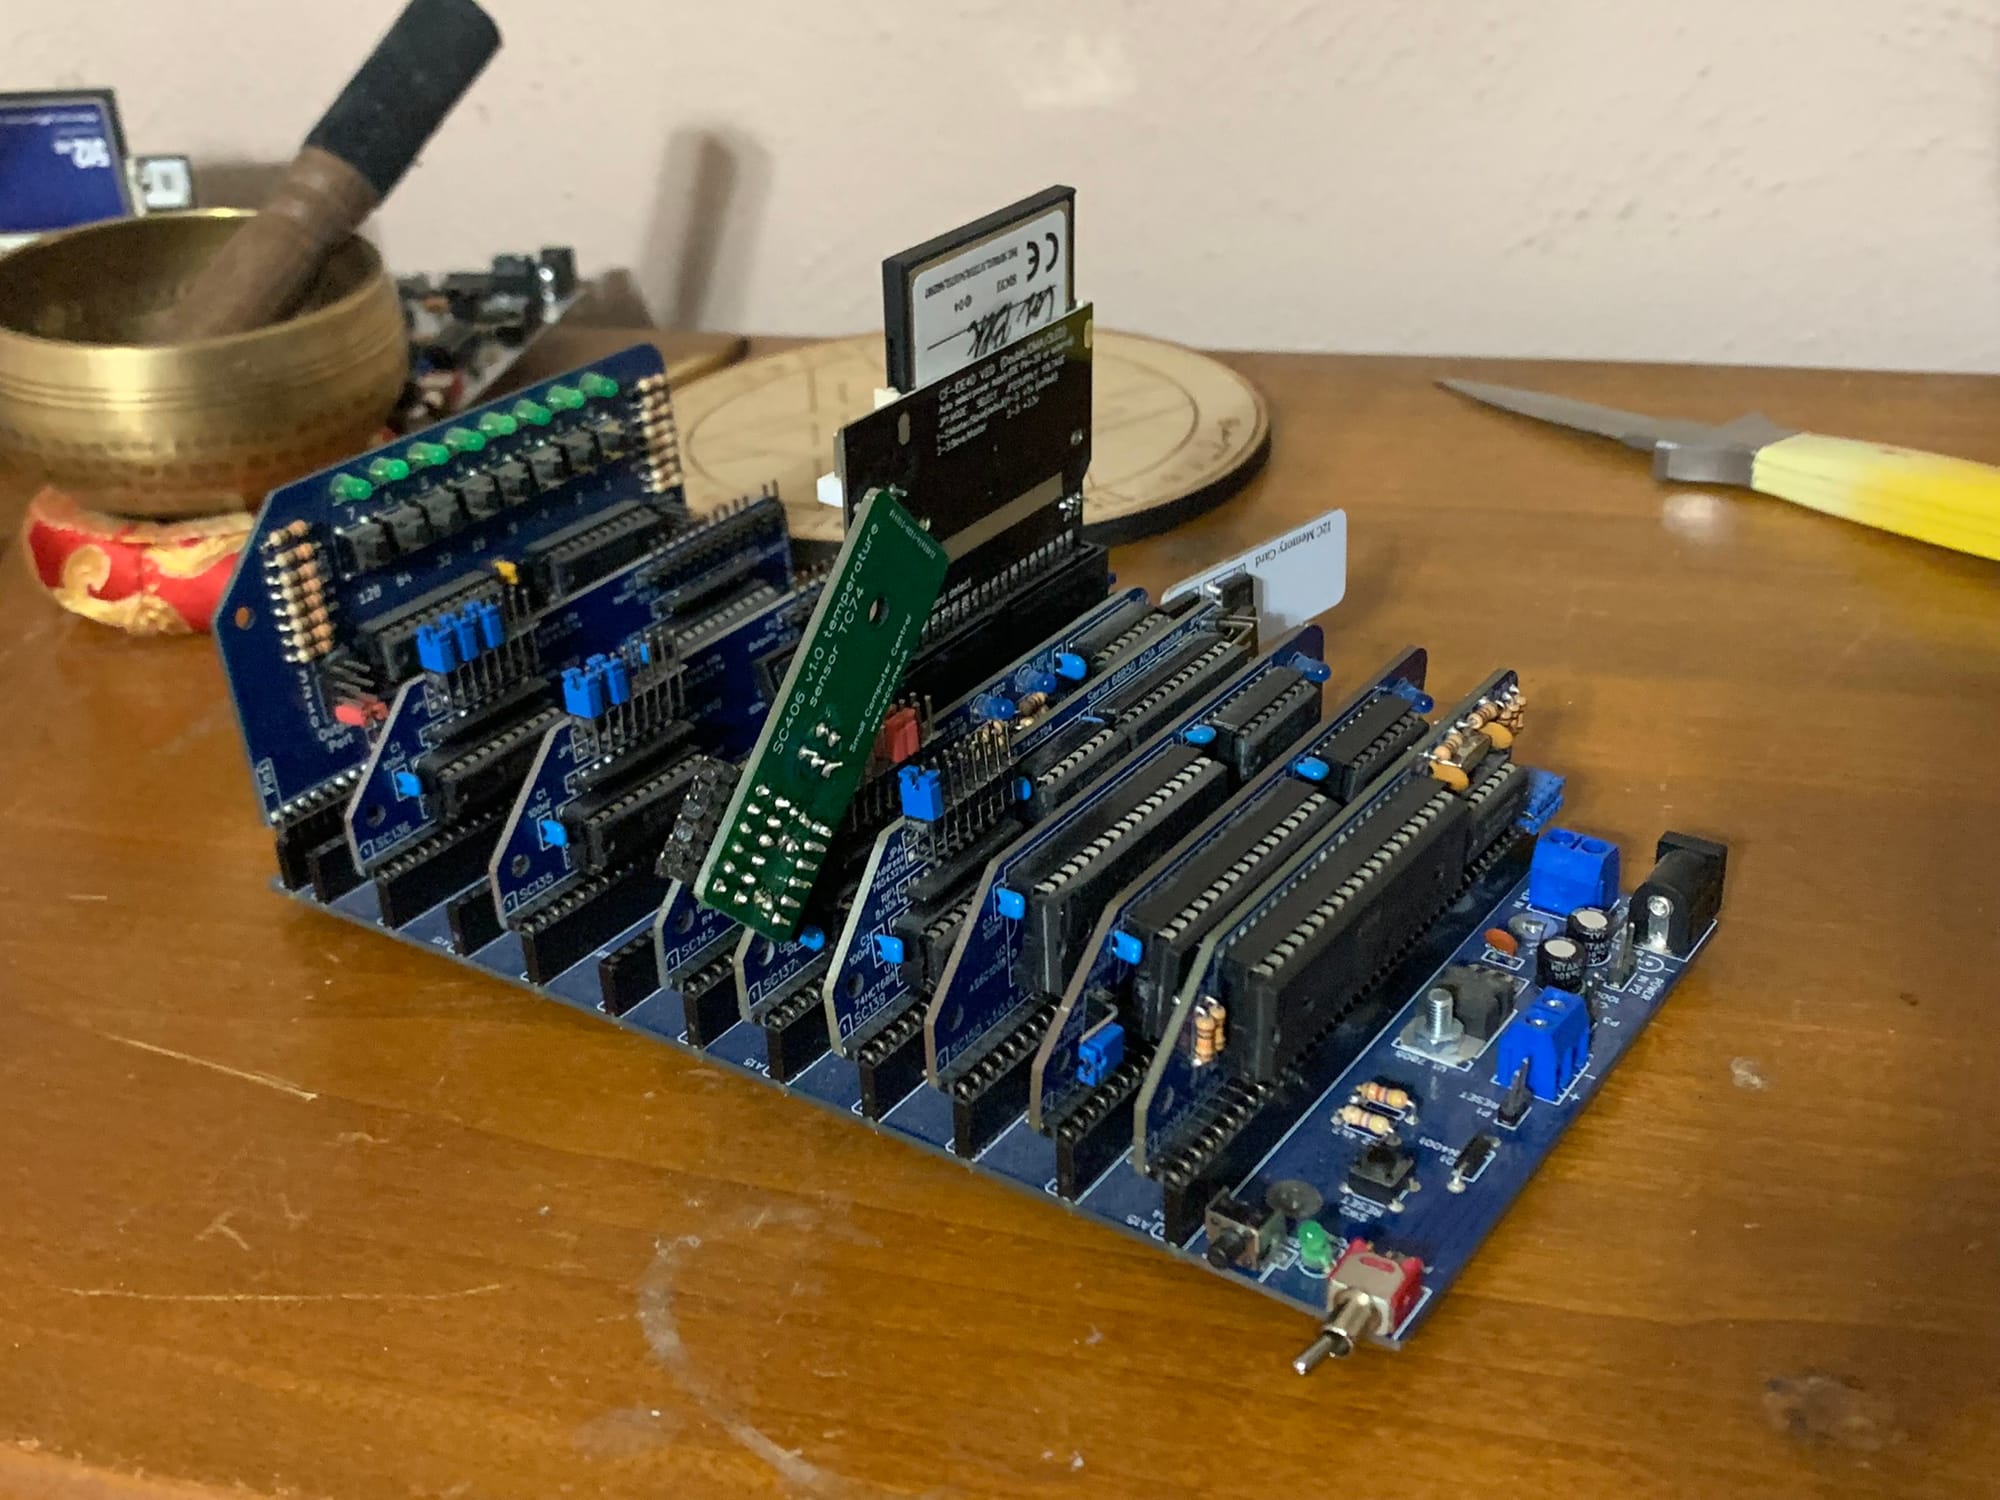
The backplanes and modules in the SC100 series include both the original 40-pin standard and the 40pin-plus standard; or what the RC2014 developers would call the RC2014 Enhanced Bus. There are a range of configurations one can achieve by selecting backplanes and modules from this lineup, and they are largely software compatible with one another.
This particular build seeks to replicate and enhance my original RC2014 computer, which has long been retired and whose parts have been contributed to other devs. It does the job well by supplying modules that are essentially identical to the original RC2014 design as well as enhanced modules such as the SC150+SC151 combo; a powerful RAM/ROM pair with their own paging capabilities. It is, again, these paging capabilities that will be the focus of today's discussion.
The Software
There are more options than ever in the open source space for running code on modern, 8-Bit platforms. From monitors, which can be impressively robust despite their simplicity, to multi-tasking operating systems. The hardware can run both modern and vintage software and the procedures for doing so have varying levels of documentation available; from fully documented and well explained to the abstract ramblings and half-completed thoughts of a brilliant and long-gone mad-person.
What this means in practice is that a developer may wish to explore these different execution environments on a single system, which can require frequent changes to the ROM of the system. There are various ways to ease the burden this represents, most notably by installing a Zero Insertion Force (ZIF) socket on your memory module. This is an added cost, though, and limits how you can arrange modules on a backplane.
Without a ZIF socket to aid in the removal of ROM chips, tools must be used to forcibly pry or pull the chip from its socket. This is the most common approach but it can lead to bent pins and damage to modules as it requires some amount of force.
Some operating system firmwares include flashing utilities, which allow devs to write new code to the ROM chip without removing the module from the system. RomWBW and Zeal-8-Bit OS are notable examples. With the memory modules used by our example workstations, we can write our own flashing software for ecosystems that lack them; though this will take some time.
The operating environments we'll use for our workstations are the Small Computer Monitor (SCM), CollapseOS, CP/M 2.2, and RomWBW. Using the paging strategies implemented by our workstations' memory modules, I have implemented two multi-boot workstations. I'll walk through how these memory modules work, and how to use them to switch between multiple operating environments on the fly.
Along the way we'll learn how to create your own applications and add them to your Small Computer Monitor build.
Paging Strategies
The SC720, as mentioned, can switch between two different ROM modules using a hardware switch. You can also use jumpers to "more permanently" enable or disable one or both of these ICs' but the hardware switch is a strong selling point for the SC720.
The paging strategy used by the SC714 is also used here. The SC714 on its own only supports a single ROM, which is worth knowing if you're planning to build your own system.
From: https://smallcomputercentral.com/sc714-rcbus-z80-memory-module/#user-guide
SC714 provides 512k bytes of banked FLASH ROM and 512k bytes of banked RAM, together with paging control of the lower 32k. This configuration is suitable for running RomWBW and CP/M.
The top 32k bytes of the 512k byte RAM are always mapped to the top 32k bytes of the Z80’s memory space (0x8000 to 0xFFFF).
At reset the bottom 32k bytes of the 512k byte FLASH ROM are mapped to the bottom 32k bytes of the Z80’s memory space (0x0000 to 0x7FFF).
Any of the sixteen 32k byte FLASH ROM banks (0 to 15) or any of the sixteen 32k byte RAM banks (16 to 31) can be mapped to the bottom 32k bytes of the Z80’s memory space (0x0000 to 0x7FFF) with a single write to I/O address 0x78 (or 0x79). The value written to this I/O address is two times the bank number. Bits 0, 6 and 7 are ignored. This scheme has been used for compatibility with existing software.
This is a tremendous amount of memory to work with, honestly, and we could imagine operating systems that play with paging in the kernel space to utilize more than just 64k, but that's a topic for another time.
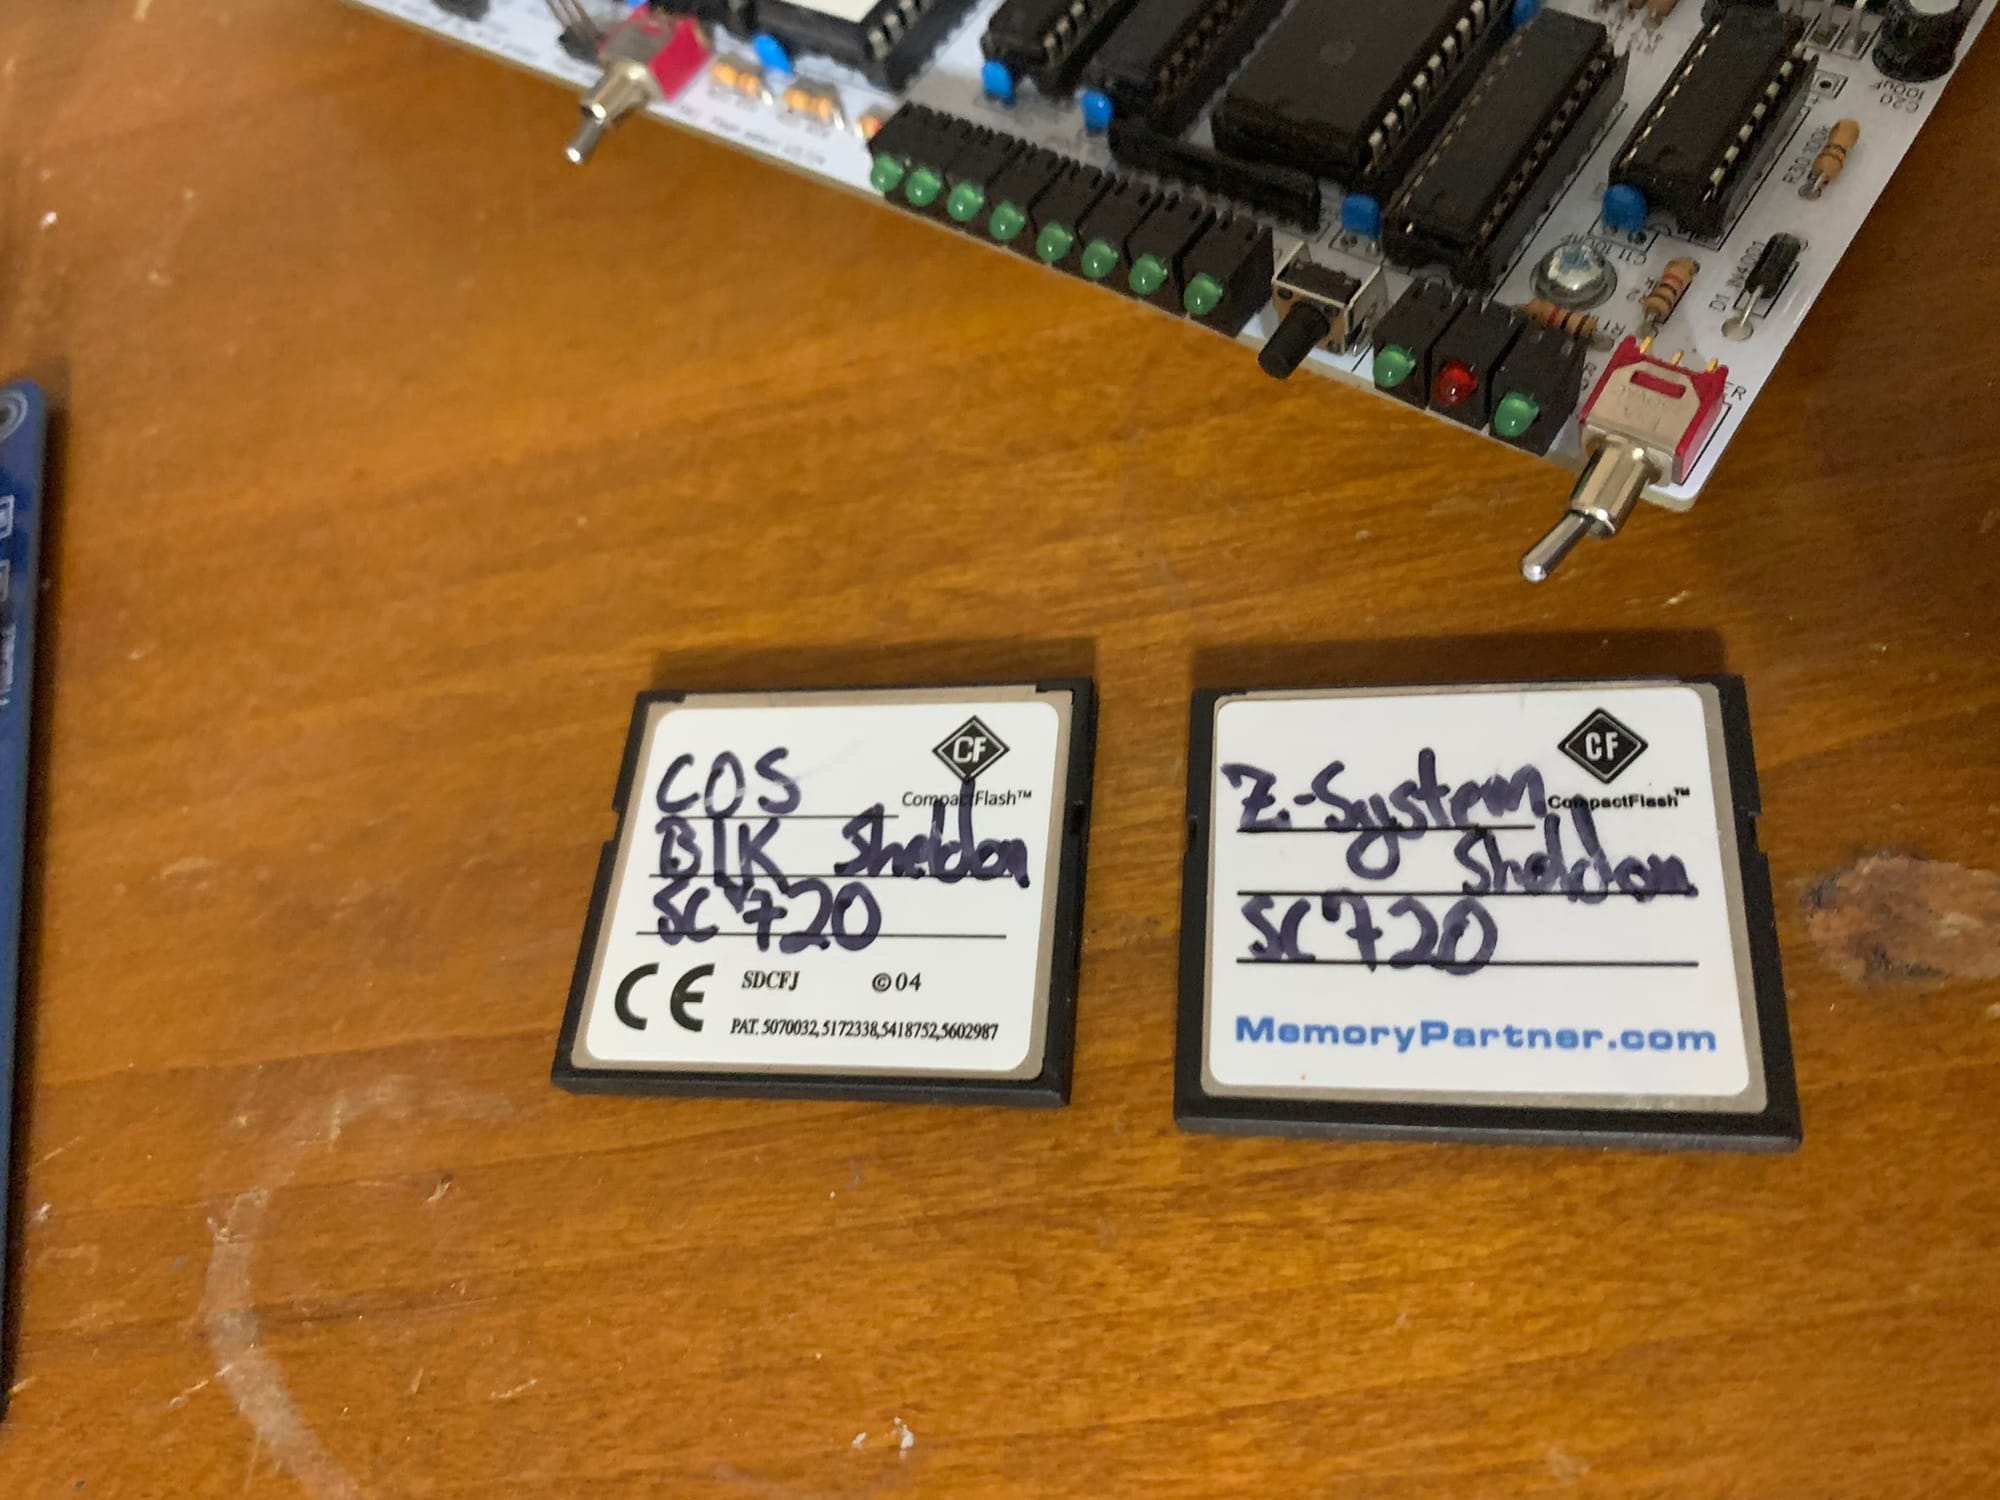
In this case we want to accomplish something fairly simple. Include two different firmware operating systems on one of the two ROM chips and be able to boot into each of them. With RomWBW taking up all the space on one of the two ROM chips installed, I can use the other to install both SCM and CollapseOS.
Given that we have 16 pages of ROM on the chip and we're only going to be using two pages (page 0 and page 1,) we actually could install a lot more than just these two firmware options. New ports might arrive that we could add to this multiboot system down the line. We'll use this system for SCM, CollapseOS, and RomWBW. It can also run CP/M 2.2 in this state, but I have not prepared the needed CF card for this build yet.
The SC150+SC151 combination of RAM and ROM modules have a different paging strategy, but one that allows us to achieve the same goal.
From: https://smallcomputercentral.com/sc151-paged-rom-module-rc2014/#user-guide
SC151 provides 128k of banked FLASH ROM together with paging control of the lower 32k. SC150 provides the matching RAM. Together they provide suitable memory for CP/M.
At reset the output bits of integrated circuit U2 are all cleared to zero (low voltage). The ROM is paged into memory from 0x0000 to 0x7FFF (32k bytes) with RAM from 0x8000 to 0xFFFF (32k bytes). When input/output address 0x38 bit 0 is set to one (a high voltage) the ROM is paged out and RAM is paged in, giving a full 64k bytes of RAM from 0x0000 to 0xFFFF.
This module contains 128k bytes of FLASH ROM, split into four 32k byte banks. The banks can be select with output addresses 0x20 bit 0 and 0x28 bit 0.
The status LED should be ON when the system is in reset. With the recommended firmware, the LED should flash OFF for about half a second when the system is released from reset. It should then turn ON and stay on. User software can then control the LED, as required.
This paging strategy uses different ports for paging between ROM, and has a dedicated port for swapping the lower 32k of ROM with RAM. The RAM module can swap between two 64k pages, which can be useful for extended memory tooling but we won't be using it here.
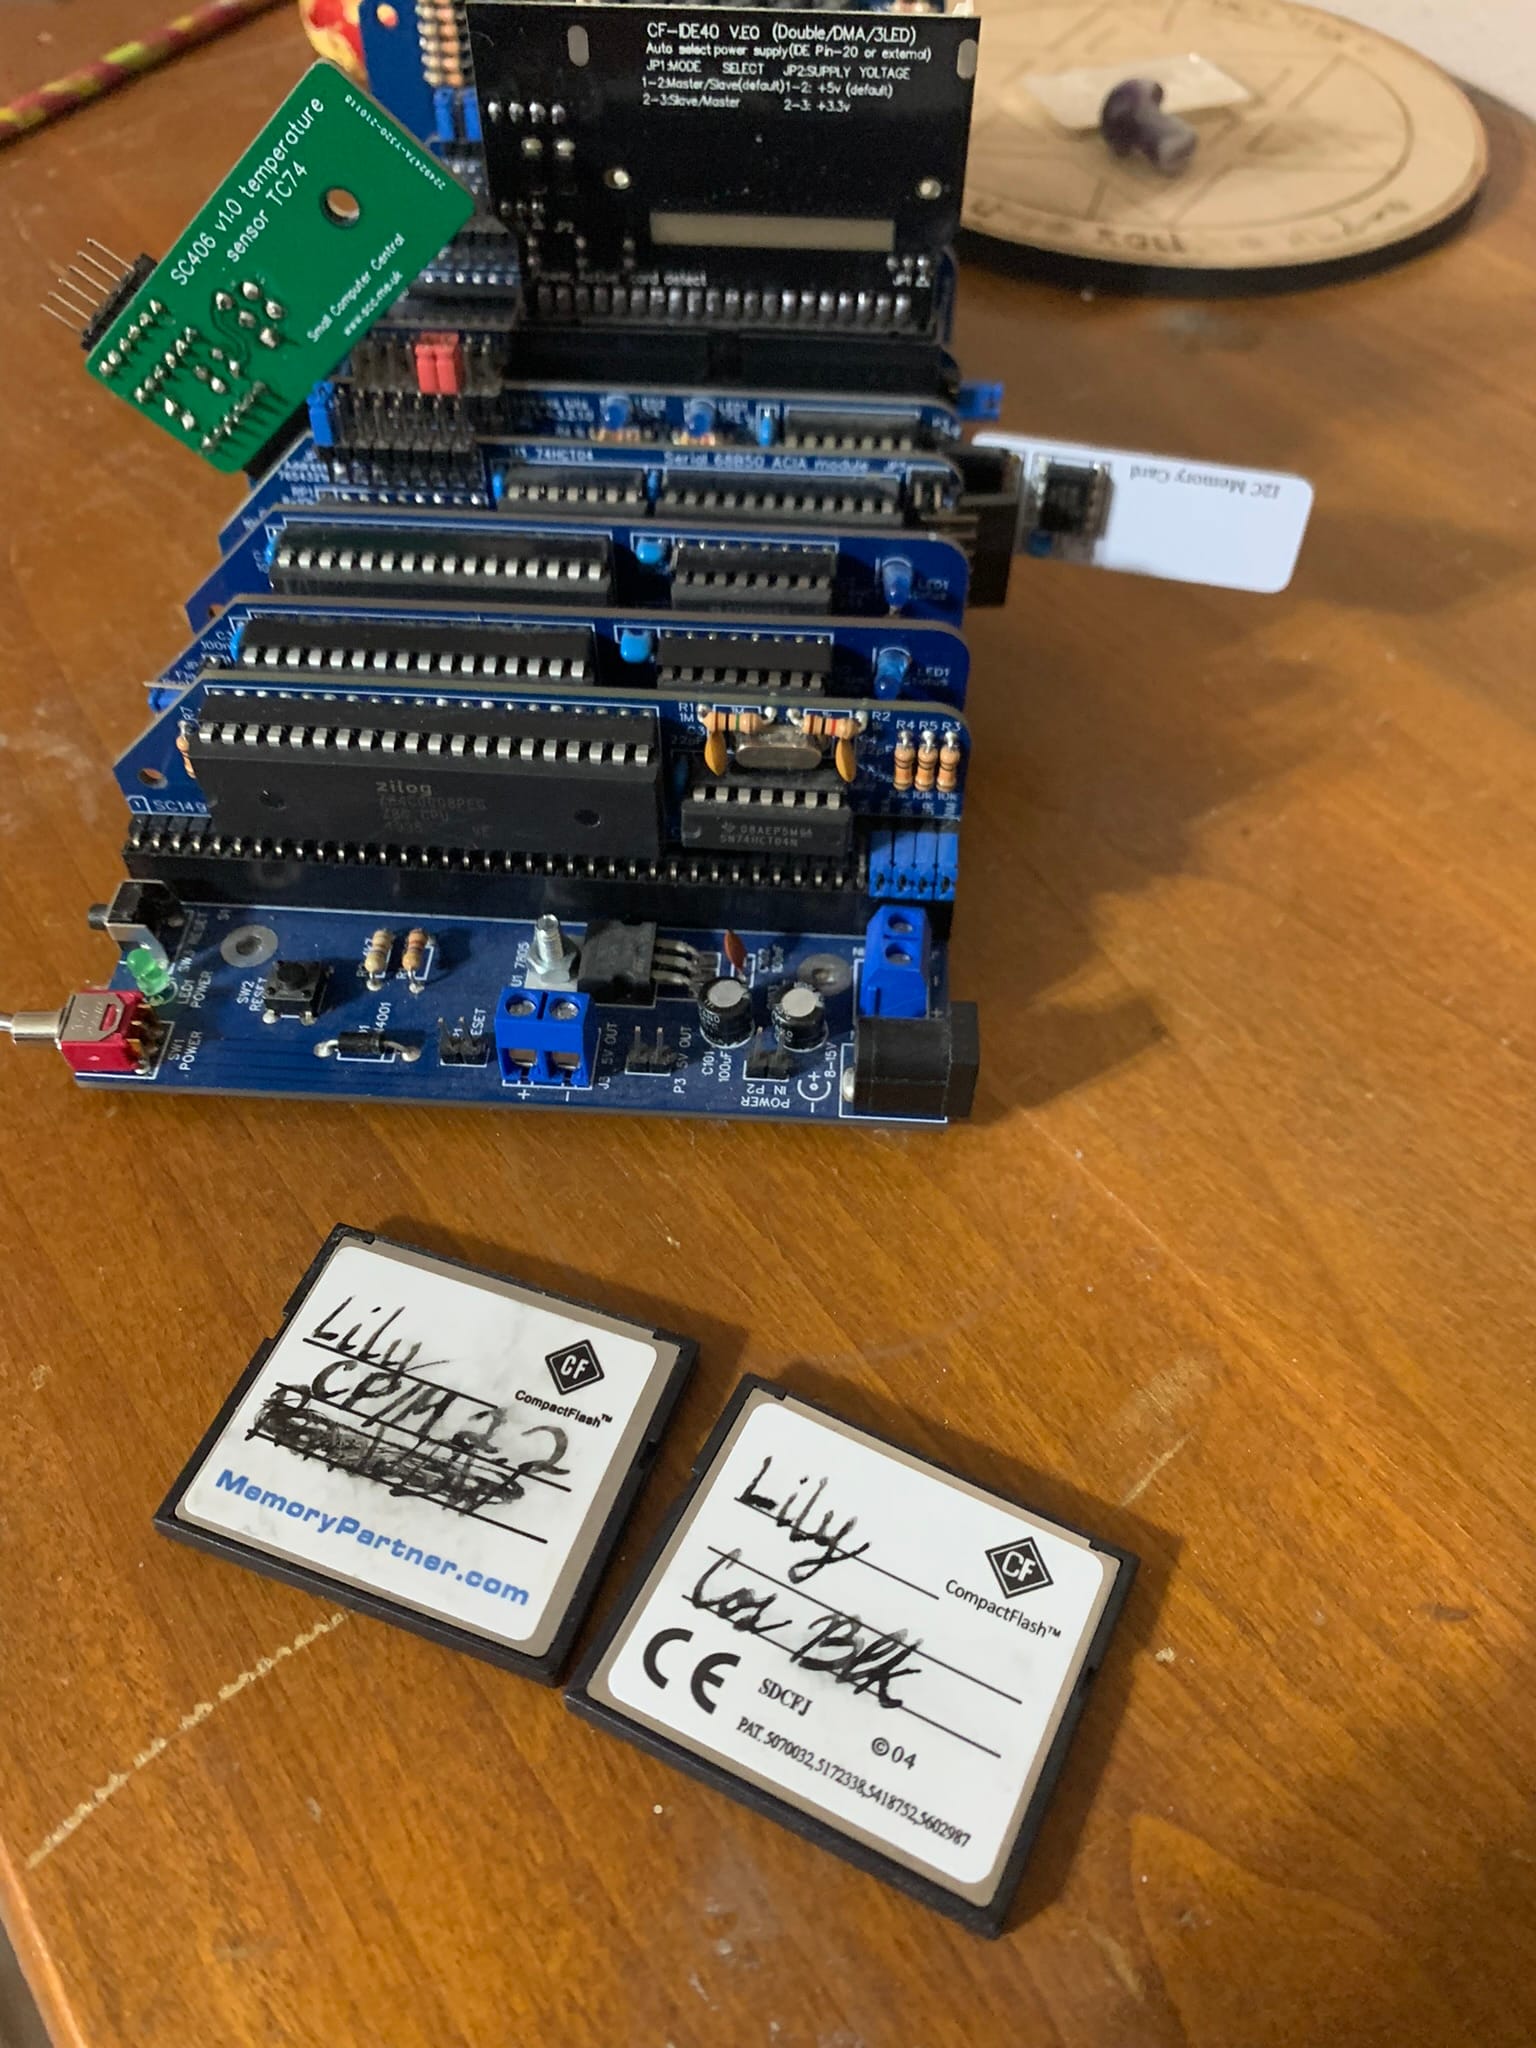
We only have 4 pages to work with for the ROM, but we only need two; again leaving space for future development. There is a build of RomWBW that will work on this system, but we're not going to be using it, instead we'll use this system for CP/M 2.2, which will live on its own Compact Flash (CF) Card.
What Do?
So we know what we need to do, how do we do it? First we need to prepare a rom image that contains the firmwares, and they have to be correctly aligned to the pages on the ROM chip. Next we need to write code that actually performs the correct paging steps to load our alternative firmware.
Remember that these modules will default to page 0 of the ROM in the lower 32k of memory, which means our first firmware will boot automatically. We can use this environment to run code that performs the appropriate paging to load what's on page 1 of the ROM. In my case, I chose SCM as my default firmware (installed on page 0) and CollapseOS as my alternate firmware.
I could have just as easily done it the other way around, but this way I got to explore the Small Computer Workshop, the latest version of which works in wine on GNU/Linux, and I can now teach you how to make modifications to SCM.
This proves to be a pretty simple set of steps:
SC720:
- Write 2 to port $78 (recall that you want to use two times the number of the page you want, in this case we want page 1.)
- Load the contents of page 1 into high memory somewhere.
- Write 32 to port $78 (this will give us page 16, the first page in the RAM module)
- Load the previously preserved contents to the first 32k.
- Jump to address 0
This seems a bit more elaborate than we need, couldn't we just page out to page 1 and then jump to 0? If you built your collapseos or other alternative firmware with a static ROM mapping, or if it takes up exactly 32k, then yes.
The reason we're storing a copy of page 1 then transferring it to page 16 is because the build of CollapseOS I'm working with takes up less than 8k. This means that I can gain extra RAM space by placing a copy in a RAM page and then running it from there.
I've covered this "full-ram" build of CollapseOS in recent Youtube videos:


SC100:
- Write 1 to port $20 (This will switch the lower 32k from page 0 to page 1, where our alternative firmware lives.)
- Load the contents of the lower 32k to high memory.
- Write 1 to port $38 (This will swap the lower 32k of RAM into the lower 32k of system memory, replacing ROM page 1)
- Load the previously preserved content to the first 32k
- Jump to address 0
As you can see, besides the different ports used, and the slight difference in how the modules actually swap pages, the procedure for booting into our alternate firmware is pretty much identical.
note: My SC100 build uses an ACIA serial module to communicate with my host system, whereas my SC720 uses an SIO/2 module for the same task. These serial modules require different drivers. The build of CollapseOS for each of these systems will differ because of this. Also note that each of these systems can support both ACIA and SIO/2 modules. If you're following along you'll want to be sure you know which build you need for which serial module.
Building the Rom
This part is pretty simple. You'll want to build or obtain builds of your chosen firmware and concatenate them together. You'll need to inspect each build to ensure it's aligned properly and you may need to modify the code or the binary file itself to achieve this.
I've covered building CollapseOS in detail in a recent video, but I'll cover the basics here. Once you obtain the source code, which can be found at the link below, you'll simply run the make command with the appropriate CONF variable to obtain the binary file you need.
http://duskos.org/files/collapseos-rc2014.tar.gz
CollapseOS defaults to an ACIA and SD card based build. For an ACIA and CF card build, you'll want to use the cf CONF. For an SIO/2 and CF card build, you'll want to use the sio_cf config. You may have to write this config yourself, as I am unsure if my submitted changes have made it upstream. Be sure to set HERESTART to 0 in order to take advantage of the full memory configuration. For more details on how to perform these configurations, please check here:
Store this ROM somewhere safe, with a meaningful name. I have unique names for each of my system's roms such as SC720_SCM_v131.bin, SC100_SCM_v131.bin, rc2014_sio_cf_sc720.rom, etc.
If you're using CollapseOS as your primary firmware and want it on page 0 of the ROM, you'll want to ensure the file is the correct size so that your alternate firmware can align on the first address in page 1. This is simply a matter of using the truncate command:
truncate -s 32768 rc2014_sio_cf.rom
Though the truncate command sounds like it's meant to make files smaller, and it can do that, it can also make files larger and will pad out that space with zeroes. This will give you a rom file that is exactly 32k in size.
Next we'll obtain the Small Computer Monitor rom. We can grab this rom directly from SmallComputerCentral or we can build it ourselves with the Small Computer Workshop, which also includes the same prebuilt binaries available online.
The only reason we'll need to build our own binaries is if we want to make changes, and we will, but let's revisit that shortly. For now we grab our builds of the SCM directly. These builds can sometimes include very slightly more data than exactly 32k, though no important data extends beyond that space, so you'll want to perform the same trick as above to ensure they are the correct size to ensure page alignment:
SC720: https://smallcomputercentral.com/firmware/firmware-scm-s7/
SC100: https://smallcomputercentral.com/firmware-scm-s8/
truncate -s 32768 SC720_SCM_v131.bin
Now we can put them together by concatenating them into a single file:
$ cat SC720_SCM_v131.bin > SCM_COS_SIO.ROM
$ cat rc2014_sio_cf >> SCM_COS_SIO.ROM
For a final touch you can use truncate to size the file to fit exactly in 2 pages or exactly in 16 pages, or anything in between. If you truncate it to 2 pages, you can then concatenate a third firmware rom directly to the end of it without further modification; though you'll likely want to build a whole new rom for that use case, and here's why:
Including Bootloaders
As mentioned previously, we could have easily chosen CollapseOS for page 0 and used it to boot into SCM, but doing it this way gives us some advantages. Most importantly SCM can receive hex files over the serial device which can then be run in memory. The other major advantage is that we can use Small Computer Workshop to not only write bootloaders which we can load over serial, but rebuild the SCM rom to include those bootloaders out-of-box.
You can do the same with CollapseOS, of course, but the procedure is different and we've already explored CollapseOS thoroughly in the video above. Small Computer Monitor is an interesting project in that it was developed within its own IDE, called the Small Computer Workshop: https://smallcomputercentral.com/small-computer-workshop/
The IDE, while essentially an alpha toolkit, is unsurprisingly robust; given that it was developed by the tremendously talented Steve Cousins. The latest revision even runs in wine on Linux, which is more than can be said for many windows tools in the Z80 ecosystem, including previous revisions of Small Computer Workshop (SCW.)
We can write some simple assembly language code and compile it with the workshop, which will produce a binary file compatible with SCM.
SC720:
  ORG     $8000
  LD      A,2
  OUT     ($78),A
  LD      DE,$9000
  LD      HL,$0000
  LD      BC,$2000
  LDIR
  LD      A,$20
  OUT     ($78),A
  LD      DE,$0000
  LD      HL,$9000
  LD      BC,$2000
  LDIR
  JP      0
SC100:
  .ORG $8000
  ld a,1
  out ($20),a
  ld de,$9000
  ld hl,$0000
  ld bc,$2000
  ldir
  out ($38),a
  ld de,$0000
  ld hl,$9000
  ld bc,$2000
  ldir
  jp 0
The LDIR instruction takes the contents starting at HL and copies them to the location at DE, incrementing DE and HL and decrementing BC for each byte copied until BC reaches 0. I like to think of DE as standing for "DEstination," HL standing for "Home Location," and BC standing for "Byte Count." This is the instruction that performs our copies of CollapseOS between each page.
Let's take a quick look at our SCW directory:
gaiusjocundus@Computron ~/src/smallcomputercentral/SCW039Modified $ls
msvbvm60.dll  ReadMe.txt  SCWorkshop.exe      SCWorkshopResources
Output        SCMonitor   SCWorkshopProjects  Third-party-contributions
The important directories for us here are Output and SCMonitor/Source. Whatever SCWorkshop.exe assembles will land in Output, overwriting anything previously stored there.
gaiusjocundus@Computron ~/src/smallcomputercentral/SCW039Modified $ls SCMonitor/Source/
 BIOS     Copyright.txt  '!Main.asm'   System
 Config   History.txt     Monitor
When we first open SCW it will default to opening the file named !Main.asm. We can open our own files but let's take a look at the main file real quick:
; **********************************************************************


; **  Small Computer Monitor (SCM)    v1.3.1    by Stephen C Cousins  **
; **                                                                  **
; **  Developed with Small Computer Workshop (IDE)     www.scc.me.uk  **
; **********************************************************************

; **********************************************************************
; Options (comment out any that are not required)

;#DEFINE    BUILD_AS_COM_FILE   ;Build as CP/M style .COM file (not as ROM)

; **********************************************************************
; Only one build configuration can be defined so comment out the others

; Tested with this version of SCM code
;#INCLUDE   Config\config_F1_SC516_118.asm  ;F1, "Z50Bus/Z80",  as SC516 & SC118
;#INCLUDE   Config\config_F2_SC519.asm        ;F2, "Z50Bus/Z80",  as SC519+518
;#INCLUDE   Config\config_F3_SC503_140.asm    ;F3, "Z50Bus/Z180", as SC503 & SC140
;#INCLUDE   Config\config_S2_SC114.asm        ;S2, "RC/Z80",      as SC114
;#INCLUDE   Config\config_S3_SC108.asm        ;S3, "RC/Z80",      as SC108
;#INCLUDE   Config\config_S5_SC111_119.asm    ;S5, "RC/Z180",     as SC111+119, native mode
;#INCLUDE   Config\config_S6_SC126.asm        ;S6, "SC126",       as SC126 Z180 SBC / motherboard
;#INCLUDE   Config\config_S7_SC714.asm  ;S7, "RC/Z80",      as SC714 & SC720
#INCLUDE   Config\config_S8_SC150_151.asm  ;S8, "RC/Z80",      as SC151+152 & SC152 & SC707
;#INCLUDE   Config\config_S9_SC722_721.asm    ;S9, "RC/Z180",     as SC722+721, native mode
;#INCLUDE   Config\config_W1_SCWorkshop.asm   ;W1, "SCWorkshop",  SCW simulated hardware

; Not tested with this version of SCM code (see earlier release version)
;#INCLUDE   Config\config_C1_SC121.asm         ;Z80 Processor for Z80sc (SC121)             NOT TESTED
;#INCLUDE   Config\config_E1_CPM.asm           ;External OS = CP/M                          NEEDS WORK
;#INCLUDE   Config\config_E2_RomWBW.asm        ;External OS = RomWBW                        NEEDS WORK
;#INCLUDE   Config\config_J1_ColecoVision.asm  ;ColecoVision games debug on SC126           NOT TESTED
;#INCLUDE   Config\config_S4_SC111.asm         ;S4, "RC/Z180",     as SC111, legacy mode (Z80 replacement)
;#INCLUDE   Config\config_S?_SC130.asm         ;S?, "SC130",  SC130 Z180 SBC/Motherboard for RC2014 (SC130)     TO DO
;#INCLUDE   Config\config_S?_SC131.asm         ;Z180 pocket-sized RomWBW computer (SC131)   NOT TESTED
;#INCLUDE   Config\config_Z8_ZORAk.asm         ;Steve Markowski's ZORAk system              CURRENTLY BROKEN

; Personal configurations
;#INCLUDE   Config\config_MySC126.asm          ;SC126 Z80 SBC/Motherboard for RC2014


;#INCLUDE   Config\configTest.asm
This is a deceptively simple file. As you can see, it consists of a series of configuration files, and expects only one of those configs to be uncommented, and thus, active at a time. This means that modification of a firmware build will rely on understanding and modifying these configs. Base functionality will live in different places, but our goal is to include bootloader code in the SCM rom, which shouldn't involve changing any core functionality.
First, though, we need to actually build the code samples from before. We simply open one file in the IDE, click the Assemble button, safely store the Binary.bin file and the IntelHex.hex files that are generated in the Output directory, then repeat with the next file.
I have stored these files with names such as cos_loader_sc720.hex and cos_loader_sc100.hex. Note that the hex file is what we want here, though we can easily convert between binary and hex formats with bin2hex.py and hex2bin.py as needed.
So now we have the rom files and the loaders, separately, we can install the rom files onto the ROM chips in the traditional way, using a chip programmer, and then upload the cos_loader hex files to SCM over the serial line. At that point, we can jump to the loader app as we would any other SCM app and boot into COS.
Sending hex files to SCM is a topic I cover in depth here:
When we've loaded these up we can type g8000 to jump directly to address 0x8000, which is where our SCM app starts, and should result in a bootup into CollapseOS.
Modifying SCM
One reason SCM Apps are distributed separately, rather than being embedded into the monitor, is that an app might take up more space than we want to spare on the ROM. Since our bootloader code is so small, and since we have coupled these systems together in a single rom, it makes sense to simply include them in the SCM rom.
To do so let's look back at our Config files. For the SC720 we want to use the S7 configuration and for the SC100 we want to use the S8 configuration. That means we'll want to include our application code as SCM commands conditionally, to include the correct loader for the correct config.
Tracing through the code led me to the primary file of concern: ~/src/smallcomputercentral/SCW039Modified/SCMonitor/Source/Config/Common/ROM_Info_SC32k.asm.
This is the file in which we define SCM applications and help output and it's surprisingly simple. Here is my file after modification:
; **********************************************************************
; **  ROM info: SC32k                           by Stephen C Cousins  **
; **********************************************************************

            .CODE

            .ORG 0x3000         ;Inserted files start here

; Executable: COS.COM
CosCode:
#IF COS_HOST = "SC720"
#INSERTHEX ..\Apps\cos_loader\cos_loader_sc720.hex
#ENDIF
#IF COS_HOST = "SC100"
#INSERTHEX ..\Apps\cos_loader\cos_loader_sc100.hex
#ENDIF
CosCodeEnd:

; Executable: BASIC.COM
BasicCode:
#INSERTHEX  ..\Apps\MSBASIC_adapted_by_GSearle\SCMon_BASIC_code3000_data8000.hex
BasicCodeEnd:
BasicCodeW: .EQU BasicCode+3    ;Warm start entry

; Executable: CPM.COM
#IFNDEF     CFBASE1
#DEFINE     CFBASE1 "0x10"
#ENDIF
#IF         PROCESSOR = "Z80"
CPMCode:
#IF         CFBASE1 = "0x10"
#INSERTHEX  ..\Apps\CPM_load_from_compact_flash\SCMon_CPM_loader_Z80_0x10_code8000.hex
#ENDIF
#IF         CFBASE1 = "0x90"
#INSERTHEX  ..\Apps\CPM_load_from_compact_flash\SCMon_CPM_loader_Z80_0x90_code8000.hex
#ENDIF
#ENDIF
#IF         PROCESSOR = "Z180"
CPMCode:
#IF         CFBASE1 = "0x10"
#INSERTHEX  ..\Apps\CPM_load_from_compact_flash\SCMon_CPM_loader_Z180xC0_0x10_code8000.hex
#ENDIF
#IF         CFBASE1 = "0x90"
#INSERTHEX  ..\Apps\CPM_load_from_compact_flash\SCMon_CPM_loader_Z180xC0_0x90_code8000.hex
#ENDIF
#ENDIF
CPMCodeEnd:

; Help extension: COS.HLP
CosHelp:    .DB  "COS      Boot collapseos from page 1.",0x0D,0x0A
            .DB  0
CosHelpEnd:

; Help extension: BASIC.HLP
BasicHelp:  .DB  "BASIC    Grant Searle's adaptation of Microsoft BASIC",0x0D,0x0A
            .DB  "WBASIC   Warm start BASIC (retains BASIC program)",0x0D,0x0A
            .DB  0
BasicHelpEnd:

; Help extension: CPM.HLP
CPMHelp:    .DB  "CPM      Load CP/M from Compact Flash (requires prepared CF card)",0x0D,0x0A
;           .DB  "CPM      Load CP/M from Compact Flash",0x0D,0x0A
            .DB  0
CPMHelpEnd:

            .ORG 0x7F80         ;File references downwards from 0x7FF0

            .DW  0xAA55         ;Identifier
            .DB  "COS     "     ;File name ("COS.HLP")
            .DB  0x03           ;File type 3 = Help
            .DB  0              ;Not used
            .DW  CosHelp        ;Start address
            .DW  CosHelpEnd-CosHelp ;Length

            .DW  0xAA55         ;Identifier
            .DB  "COS     "     ;File name ("COS.COM")
            .DB  0x41           ;File type 1 = Monitor command, moved to RAM
            .DB  0x80           ;Run in RAM at 0x8000
            .DW  CosCode        ;Start address
            .DW  CosCodeEnd-CosCode ;Length

            .DW  0xAA55         ;Identifier
            .DB  "BASIC   "     ;File name ("BASIC.HLP")
            .DB  0x03           ;File type 3 = Help
            .DB  0             ;Not used
            .DW  BasicHelp      ;Start address
            .DW  BasicHelpEnd-BasicHelp ;Length

            .DW  0xAA55         ;Identifier
            .DB  "WBASIC  "     ;File name ("WBASIC.COM")
            .DB  0x01           ;File type 1 = Monitor command
            .DB  0              ;Not used
            .DW  BasicCodeW     ;Start address
            .DW  BasicCodeEnd-BasicCodeW  ;Length

            .DW  0xAA55         ;Identifier
            .DB  "BASIC   "     ;File name ("BASIC.COM")
            .DB  0x01           ;File type 1 = Monitor command
            .DB  0              ;Not used
            .DW  BasicCode      ;Start address
            .DW  BasicCodeEnd-BasicCode ;Length

            .DW  0xAA55         ;Identifier
            .DB  "CPM     "     ;File name ("CPM.HLP")
            .DB  0x03           ;File type 3 = Help
            .DB  0              ;Not used
            .DW  CPMHelp        ;Start address
            .DW  CPMHelpEnd-CPMHelp ;Length

            .DW  0xAA55         ;Identifier
            .DB  "CPM     "     ;File name ("CPM.COM")
            .DB  0x41           ;File type 1 = Monitor command, moved to RAM
            .DB  0x80           ;Run in RAM at 0x8000
            .DW  CPMCode        ;Start address
            .DW  CPMCodeEnd-CPMCode ;Length

#INCLUDE    Monitor\MonitorInfo.asm
; Include Monitor.EXE information at top of bank 1. eg:
;           .ORG 0x1FF0         ;First ROMFS file in 8k bank
;           .DW  0xAA55         ;Identifier
;           .DB  "Monitor "     ;File name ("Monitor.EXE")
;           .DB  2              ;File type 2 = Executable from ROM
;           .DB  0              ;Not used
;           .DW  0x0000         ;Start address
;           .DW  0x2000         ;Length

; **********************************************************************
; **  End of ROM information module                                   **
; **********************************************************************
The important changes are these:
...
...
; Executable: COS.COM
CosCode:
#IF COS_HOST = "SC720"
#INSERTHEX ..\Apps\cos_loader\cos_loader_sc720.hex
#ENDIF
#IF COS_HOST = "SC100"
#INSERTHEX ..\Apps\cos_loader\cos_loader_sc100.hex
#ENDIF
CosCodeEnd:
...
...
...
; Help extension: COS.HLP
CosHelp:    .DB  "COS      Boot collapseos from page 1.",0x0D,0x0A
            .DB  0
CosHelpEnd:
...
...
...
            .ORG 0x7F80         ;File references downwards from 0x7FF0
                                ;Reduce by 16 bytes for each new entry
            .DW  0xAA55         ;Identifier
            .DB  "COS     "     ;File name ("COS.HLP")
            .DB  0x03           ;File type 3 = Help
            .DB  0              ;Not used
            .DW  CosHelp        ;Start address
            .DW  CosHelpEnd-CosHelp ;Length

            .DW  0xAA55         ;Identifier
            .DB  "COS     "     ;File name ("COS.COM")
            .DB  0x41           ;File type 1 = Monitor command, moved to RAM
            .DB  0x80           ;Run in RAM at 0x8000
            .DW  CosCode        ;Start address
            .DW  CosCodeEnd-CosCode ;Length
...
...
...
Note that I also had to create the cos_loader directory and files in the correct places.
This change won't be compatible with every configuration unless and until you add bootloaders for them, which may not be viable for every available config. You'll also need to define the appropriate COS_HOST macro in each appropriate config:
SC720:
~/src/smallcomputercentral/SCW039Modified/SCMonitor/Source/Config/config_S7_SC714.asm
Add the following somewhere before the #INCLUDE Config\Common\ROM_Info_SC32k.asm: #DEFINE COS_HOST SC702, like so:
...
...
...
; **********************************************************************
; Build the code

#INCLUDE    System\Begin.asm

#INCLUDE    BIOS\SCZ80\Manager.asm

#INCLUDE    System\End.asm

#DEFINE     COS_HOST SC720    ;Include collapseos loader
#INCLUDE    Config\Common\ROM_Info_SC32k.asm
SC100:
~/src/smallcomputercentral/SCW039Modified/SCMonitor/Source/Config/config_S8_SC150_151.asm
Add the following somewhere before the #INCLUDE Config\Common\ROM_Info_SC32k.asm: #DEFINE COS_HOST SC100, like so:
...
...
...
; **********************************************************************
; Build the code

#INCLUDE    System\Begin.asm

#INCLUDE    BIOS\SCZ80\Manager.asm

#INCLUDE    System\End.asm

#DEFINE     COS_HOST SC100    ;Include collapseos loader for host
#INCLUDE    Config\Common\ROM_Info_SC32k.asm
Note that you may have to change the final include statement to point to the correct ROM_Info_SC32k.asm file, as it may be pointing instead to an older duplicate located in: ~/src/smallcomputercentral/SCW039Modified/SCMonitor/Source/Config/Common/2022-02-18. Making this change works fine.
Now, open up SCW and for each of the two configs uncomment the appropriate line, assemble it, and safely store away the Binary.bin and/or IntelHex.hex file with appropriate names in turn. You can then repeat the binary production procedure outlined above and reprogram your ROM chip. Now you can boot into CollapseOS from SCM by simply typing cos.
Alternatively, you could go to my Downloads page and get prebuilt and tested copies and simply install those on your SC720, SC714, or SC150+SC151 based systems.
Conclusion and Goals
While this process would have made a good video, I'm not yet set up for audio/video production after some life-changing events. Multibooting on SCC systems, however, has proven incredibly useful; allowing me to switch between any given one of my chosen development platforms with minimal fuss. I knew I wanted to get the process out there for others to explore.
Understanding Small Computer Workshop and how to build and modify the SCM has proven tremendously valuable and surprisingly straightforward. This is an incredibly empowering breakthrough in understanding my chosen tools.
I hope to use this new configuration to explore the hardware ecosystem in-depth and, with some practice and patience, produce libraries and utilities for using that hardware with ease. In particular, i2c support needs to be expanded on the software side, and I would love to implement the missing ROM flashing utilities for SCM and CollapseOS.
Thanks for reading, if you made it this far you're likely actually trying to make this work on your hardware, so please feel free to reach out to me with questions if you find yourself stuck.